--------------------------------
This is part 4 of my write-up of PentesterLab’s Bootcamp course. If you see any errors or want to suggest I do something different, please contact me to let me know.
Write-up parts 1, 2, 3, 4, 5.1, 5.2, 6.
--------------------------------
                   * * * [ DISCLAIMER ] * * *
/*
 * All information in this write-up is, to the best of my knowledge,
 * truthful and accurate. However, I am only new to this, and I am
 * learning as I go, so it is entirely possible something contained
 * within this write-up is incorrect in some way. Never execute any
 * command, without knowing for sure what it is you are doing. Look
 * at the man pages of all commands if you do not understand them.
 *
 * I take no responsibility if you decide to use this information
 * to commit illegal acts. If you attempt to use these techniques
 * against devices or networks you do not either own, or have
 * permission to attack, you could end up in prison.
 *
 */
--------------------------------
--[ Step 4 ]
This step is all about SSL/TLS. We enable SSL on the apache server and write a few clients to connect to it.
--------------------------------
--[ SSL ]
First we will enable SSL on Apache and configure it to accept only the strongest encryption. For this example I will be using a self-signed and generated certificate, obviously this is not a secure practice and you should not trust or allow self-signed certificates when browsing the internet. This is for ease of learning only
First we will create a directory to store our certificate.
$ sudo mkdir /etc/apache2/sslNow we will create a self-signed certificate.
$ sudo openssl req -x509 -nodes -days 1095 -newkey rsa:2048 -out /etc/apache2/ssl/server.crt -keyout /etc/apache2/ssl/server.key* -x509 identifies a certificate requirement, as opposed to a request.
* -days xxxx sets the expiry date, in this case 1095 days.
* -nodes specifies no passphrase.
* -rsa:2048 sets the key as a 2048 bit RSA.
* -out and keyout set the location for the certificate and key.
After entering the previous command you will be prompted with the following:
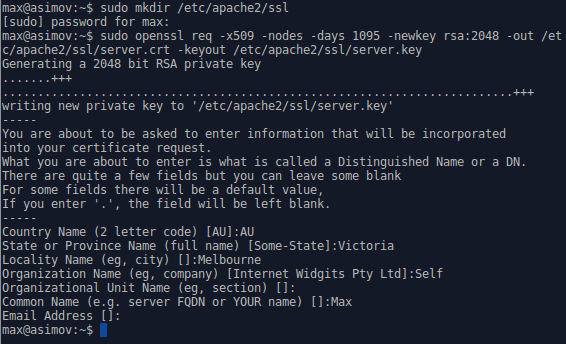
The details are less important with a self-signed certificate as it will kick back a warning not to be trusted regardless, however, these details must match the site to be considered secure.
Now we have to install the SSL mod for Apache, and create a symbolic link for the default-ssl in the sites-available directory.
$ sudo a2enmod ssl$ sudo ln -s /etc/apache2/sites-available/default-ssl.conf /etc/apache2/sites-enabled/000-default-ssl.confWe then edit the file to give it the path to our SSL certificate and key which we set when we generated the certificate.
$ sudo nano /etc/apache2/sites-enabled/000-default-ssl.conf
We also need to ensure that the ports.conf is set to listen on port 443 for HTTPS. There should be a line that says Listen 443.
$ /etc/apache2/ports.confLastly, we need to ensure that weak ciphers are disabled by forcing strong encryption. The method is described in the Apache docs.
$ sudo nano /etc/apache2/mods-enabled/ssl.confand add:
SSLCipherSuite HIGH:!aNULL:!MD5
Then we restart the server and visit our site in HTTPS.
$ sudo /etc/init.d/apache2 restart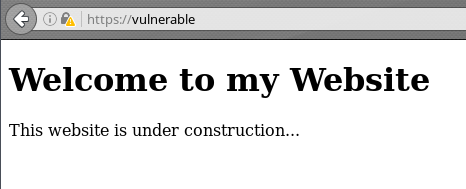
The HTTPS lock in the top left corner has the yellow ! icon signifying that it is unsecure, this is because it is a self-signed certificate and should not be trusted anyway. It is easy enough to add the certificate to the browser’s trusted issuers, but the process varies for each browser.
--------------------------------
--[ SSL Clients ]
To write an SSL client using a HTTP library is quite straight forward after the HTTP client in a previous step. You simply need to add in the HTTPS connection.
1
2
3
4
5
6
7
8
9
10
11
12
13
14
15
16
17
18
19
20
21
22
23
24
25
#!/usr/bin/python
# HTTPS Client with Header Info

import httplib

# connect to HTTPS server, send GET request, receive response
h = httplib.HTTPSConnection('vulnerable')
h.request('GET', '')
r = h.getresponse()

# get and print HTTP header response
rh = r.getheaders()
print 'Header:'
for i in rh:
    print i[0], ':', i[1]
print '\n'

# get and print content of response
rr = r.read()
print 'Content:'
print rr
print '\n'

# close HTTP connection to server
h.close()
Now, the issue with this is that the self-signed certificate will kick back a warning and will display an error when this script is run. However, the script itself works if the certificate is valid.
An SSL client script using a socket is similar to the previous socket script, but this time we import ssl and wrap the socket before connection.
1
2
3
4
5
6
7
8
9
10
11
12
13
14
15
16
17
18
#!/usr/bin/python
# HTTPS Socket Client

import socket
import ssl

# create socket
s = socket.socket(socket.AF_INET, socket.SOCK_STREAM)

# wrap socket
wrapSock = ssl.wrap_socket(s)

# connect and print reply
wrapSock.connect(("vulnerable", 443))
wrapSock.sendall("GET /\r\n")
print wrapSock.recv(4096)

wrapSock.close
Which gives us:
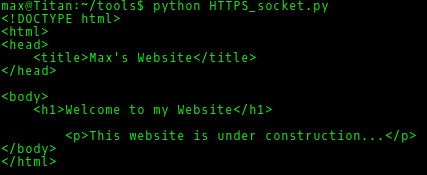
This works fine as the default parameter for ssl.wrap_socket is to not require a certificate. If you want to change the parameters surrounding certificates and encryption check out the ssl docs.
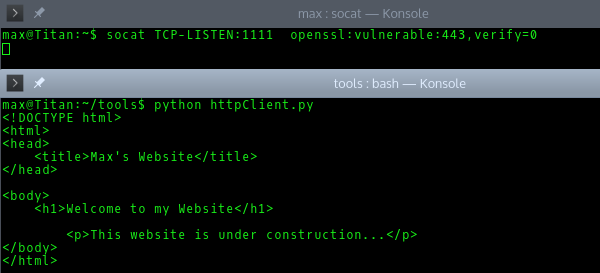
Finally, we will access the SSL server with the previous HTTP script and use socat to do the connection.
--------------------------------
/*** Part 1 - Linux and Scripting ***/
/*** Part 2 - HTTP ***/
/*** Part 3 - PHP and DNS ***/
/*** Part 5.1 - SQL Injection ***/
/*** Part 5.2 - Local File Include ***/
/*** Part 6 - More SQL Injection ***/
/*** Part 7- FTP and Traffic Analysis COMING SOON ***/
--------------------------------
 Creative Commons Attribution 4.0 International License